

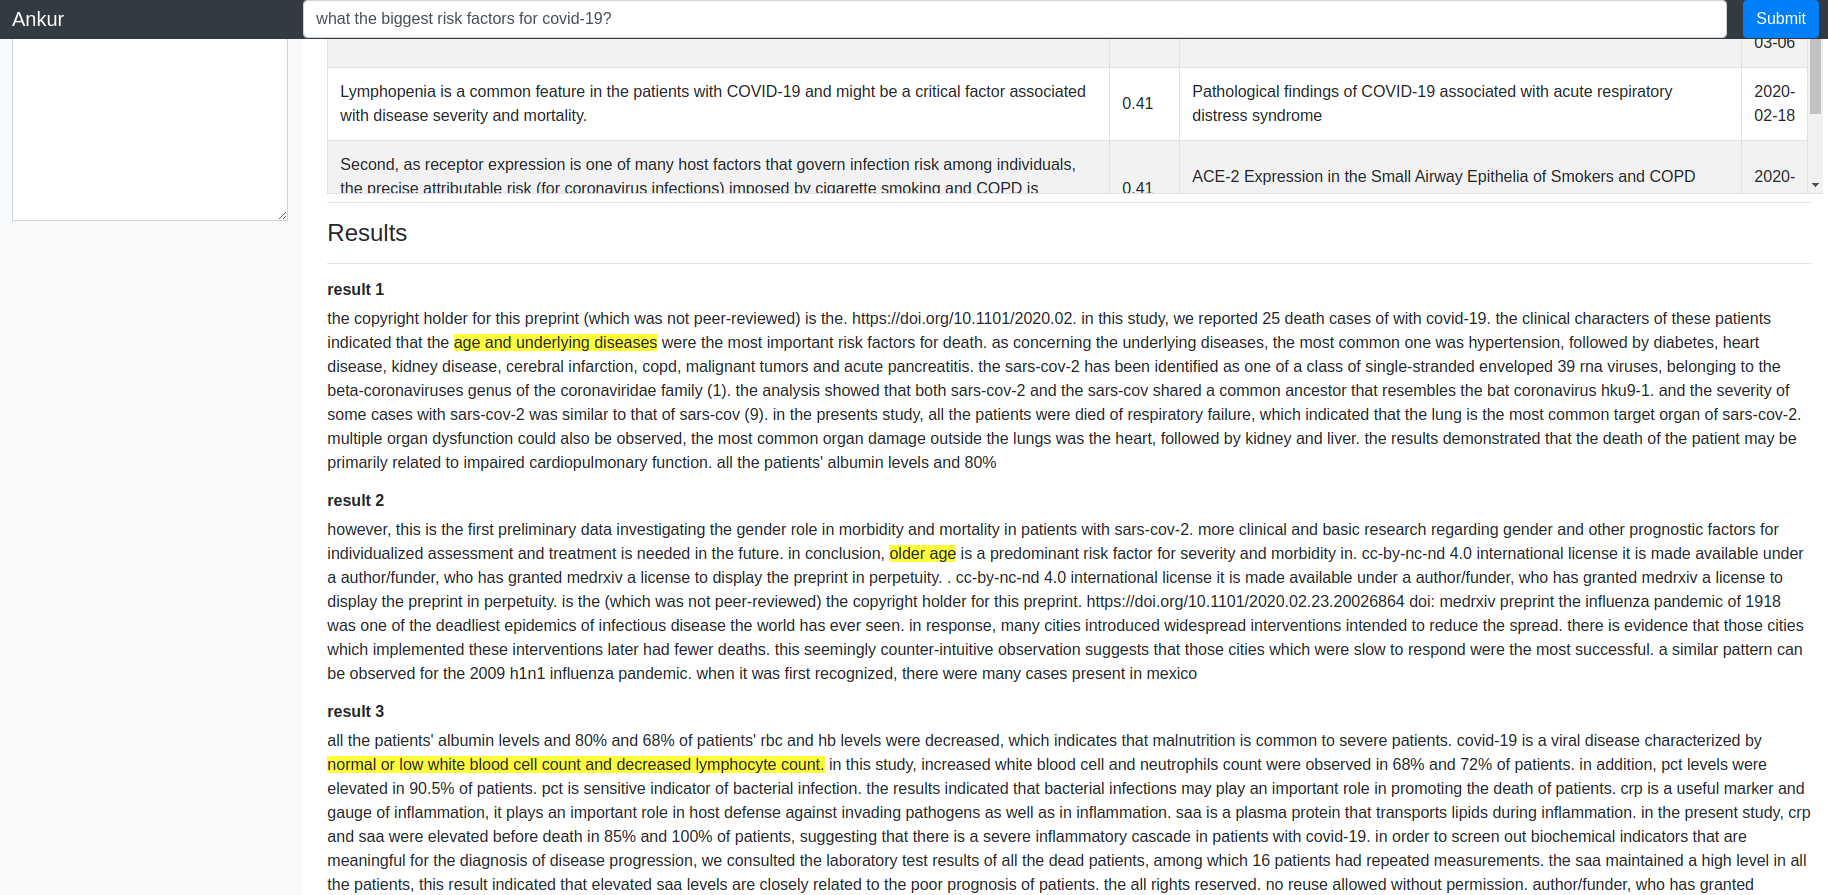
Over the last month or so, I have been working on a “Covid-19 search engine” that aims to datamine the ~44000 or so articles about Covid-19 and related infectious diseases to answer simple questions such as – “what are the biggest risk factors for Covid-19?”, “How is Covid-19 transmitted?” etc. My solution (which I’ll be writing about in detail in future posts) consists of two components – document retrieval component to quickly identify the top documents and sentences therein that are relevant to a query and a span retrieval component that uses a BERT model fined-tuned on the SQuAD dataset to identify most relevant spans in the bodytext of the top matching documents. The system works pretty well – see screenshot below. You can also try the system here.
I wanted to turn the search application running locally on my personal deep learning machine into a demo accessible over the web. The obvious solution to do such a thing is to containerize the application and host it on AWS. The trouble with this solution is that inference on BERT style models is very compute heavy. On a 1080 Ti GPU, the search takes ~3 seconds, while on a CPU it takes ~ 12 seconds. The cheapest GPU enabled on-demand instance type on AWS (at the time of this writing) is the p2.xlarge, which costs $0.90/hr (~$650/month), which is obviously insanely expensive. Now I have a pretty beefy Ubuntu desktop with a 20 core CPU and 2 1080Ti GPUs at home that I use for my deep learning experiments. I’ve also collected a number of laptops over the years that aren’t quite as powerful, but still pack quite a punch. Furthermore, I already have a reserved EC2 instance on AWS Lightsail where my website is hosted. This got me thinking – can I somehow expose my application which runs as a local Flask web server to the internet? Turns out that this is indeed possible and not so difficult to do. In this post, I’ll show you how.
System Architecture
There are 5 components of the full system (Figure 1).
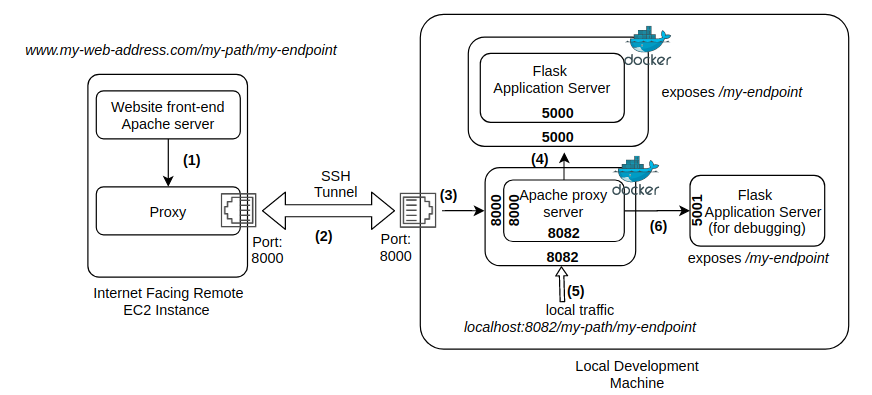
- The EC2 instance provisioned by AWS Lightsail, where my website is hosted. The website is served by an Apache server listening at the default http(s) ports.
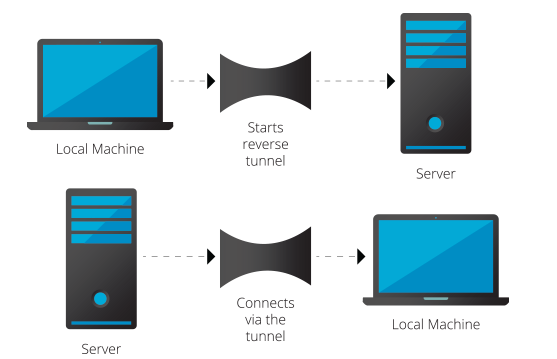
- Remote SSH port forwarding: In this technique, the local host (i.e., host of the web server that needs to be exposed) initiates a SSH tunnel to the remote host (the computer open to the internet) and assigns a socket to listen to a port on the remote host. When a connection is made to this port, the connection is forwarded over the SSH tunnel to a port on the local host. Simply put, you open a tunnel between your local machine and a remote server so that you can use the tunnel to connect from the server to your local machine. For more info, see this and this. Note that there are two ports involved – one on the remote host that can receive traffic from the internet via a proxy (described in more detail later) and another on the localhost. These two ports can be same number because they are on separate computers.
- Web server running on the local host that directs the traffic received on the local host side of the SSH tunnel to the application server. I use an Apache web server because that’s what I’m more familiar with. Other popular web servers such as nginx can also be used.
- Application server: This is your application code wrapped in a web server such as Flask or Gunicorn.
Note that I’m running my application code and the Apache web server on the local host as a docker container. Thus, I also use docker port mapping to map the port on the container to a port on the docker host. Containerizing your application code makes it possible to use container orchestration systems such as Kubernetes to set up a local cluster to run your containers. Running Apache as a container eliminates the need to install Apache on the local host.
I’ll now describe each component of the system in more detail.
Setting up reverse SSH port forwarding
The shell commands below set up the right permissions for your SSH key, prints out all open SSH tunnels, closes any existing tunnels to your remote host and sets up a new tunnel. I’m also including a few other commands you may find useful. Please note the edits you must make to your sshd_config file.
|
1 2 3 4 5 6 7 8 9 10 11 12 13 14 15 16 17 18 19 20 21 22 23 24 25 26 27 28 29 30 31 |
### ssh tunnel # first make sure the permission on PEM key file is correct (-rw------) chmod 600 <path to your pem file> # first close open ssh tunnels. # this prints out the process ids for all ssh tunnels. The awk {'print$2'} corresponds to the process ids of the ssh tunnels sudo lsof -i -n | egrep '\<ssh\>' | awk {'print$2'} # Out of these ssh tunnels, we are only interested in those to our remote server. So output of the lsof is passed to # grep <remote host IP>, which is then passed to kill -9 kill -9 $(sudo lsof -i -n | egrep '\<remote IP\>' | awk {'print$2'}) # Now set up the remote port forward # -f Requests ssh to go to background just before command execution. # -N Do not execute a remote command. # -T Disable pseudo-tty allocation. # -R Remote Port Forward. # This allows anyone on the remote server to connect to TCP port 8000 (first 8000) on the remote server. # The connection will then be tunneled back to the client host, and the client then makes a TCP connection to port # 8000 (second 8000) on local host (127.0.0.1) ssh -fNT -R 8000:127.0.0.1:8000 username@ip_of_remote_host -i <path to your pem file> ### NOTE: # for this to work, open /etc/ssh/sshd_config and add the following line at the bottom: # GatewayPorts yes # then restart ssh: # sudo service ssh restart ### Some useful commands: To see open SSH connections: # sudo lsof -i -n | egrep '\<ssh\>' # to manually kill open ssh tunnels: # kill -9 <process_id> |
Setting up a proxy to the SSH tunnel
Now that you have reverse SSH port forwarding set up, next step is to forward traffic to the SSH tunnel. Let’s say your remote server accepts internet traffic at www.my-web-address.com. You want traffic at the URL www.my-web-address.com/my-path to be forwarded to your local application server via the SSH tunnel. One way to do this is to set up a Location directive in your Apache server settings like so:
|
1 2 3 4 |
<Location "/my-path"> ProxyPass "http://127.0.0.1:8000" ProxyPassReverse "http://127.0.0.1:8000" </Location> |
This assumes that port 8000 is the port you opened on the remote host side while setting up the SSH tunnel. The syntax for other servers such as nginx will vary, but the idea is similar.
Setting up a virtual host on the Apache server on the remote host
We need a similar set up on the local host as well. The Apache server listening on the local host side of the SSH tunnel needs to proxy traffic to the application server. You may also want to serve some static content as the front end for your application. This can be done by setting up a virtual host, as shown below.
|
1 2 3 4 5 6 7 8 9 10 11 12 13 14 15 16 17 18 19 20 21 22 23 24 25 26 27 28 29 30 31 32 33 34 35 36 37 38 39 40 41 42 43 44 45 46 47 48 49 50 51 52 53 54 55 56 |
Listen 8000 Listen 8082 <VirtualHost *:8000> #ServerName <em>www.my-web-address.com/my-path</em> # some-dir is a directory in the docker container that will be mapped to a directory on the your local file system # through docker volume mapping DocumentRoot /usr/local/apache2/some-dir <Directory "/usr/local/apache2/some-dir"> Order allow,deny AllowOverride All Allow from all Require all granted </Directory> #Load the SSL module that is needed to terminate SSL on Apache LoadModule ssl_module modules/mod_ssl.so #This directive toggles the usage of the SSL/TLS Protocol Engine for proxy. Without this you cannot use HTTPS URL as your Origin Server SSLProxyEngine on # write logs to stderr so you can see them using docker logs ErrorLog /dev/stderr CustomLog /dev/stderr combined # The ProxyPass directive specifies the mapping of incoming requests to the backend server ProxyPass /my-endpoint http://172.17.0.1:5000/my-endpoint ProxyPassReverse /my-endpoint http://172.17.0.1:5000/my-endpoint </VirtualHost> # for local testing: forward traffic on port 8082 to local Flask server. Don't use 8080! Jenkins may be running on it <VirtualHost *:8082> # ServerName localhost DocumentRoot /usr/local/apache2/some-dir Alias /some-dir /usr/local/apache2/some-dir <Directory "/usr/local/apache2/some-dir"> Order allow,deny AllowOverride All Allow from all Require all granted </Directory> ErrorLog /dev/stderr CustomLog /dev/stderr combined # local testing Flask server is running as is (not as a container) on port 5001 ProxyPass /my-path/my-endpoint/ http://172.17.0.1:5001/my-endpoint/ ProxyPassReverse /my-path/my-endpoint/ http://172.17.0.1:5001/my-endpoint/ </VirtualHost> |
The corresponding Dockerfile to build the Apache image and the Docker run commands are:
|
1 2 3 4 5 6 7 8 9 10 11 12 13 14 15 16 17 18 19 20 21 22 |
# The Base Image used to create this Image FROM httpd:latest # to copy a file named httpd.conf from present working directory to the /usr/local/apache2/conf inside the container # I have taken the Standard httpd.conf file and enabled the necessary modules COPY httpd.conf /usr/local/apache2/conf/httpd.conf # This is the Additional Directory where we are going to keep our Virtualhost configuraiton files # You can use the image to create N number of different virtual hosts RUN mkdir -p /usr/local/apache2/conf/sites/ # The Base command, This command should be used to start the container CMD ["httpd", "-D", "FOREGROUND"] # To build docker image (assuming your Dockerfile is in apache directory): docker build -t $IMAGE_NAME:latest apache # To run the docker container docker run -p 8000:8000 -p 8082:8082 --name=$CONTAINER_NAME -d \ -v local-path/apache/sites/:/usr/local/apache2/conf/sites \ -v local-path/apache/sites/:/usr/local/apache2/some-dir \ -it $IMAGE_NAME:latest |
Here, the conf file containing the virtual host settings shown above and any application front end files are located in local-path/apache/sites/ on your local file system. These files are mapped to /usr/local/apache2/conf/sites and /usr/local/apache2/some-dir in the docker container using volume mapping in the docker run command. In the virtual host configuration, we set the DocumentRoot to /usr/local/apache2/some-dir so that Apache can serve a front end HTML file (say front-end.hmtl) in response to www.my-web-address.com/my-path/front-end.html.
To instruct Apache to read your virtual host configuration file from /usr/local/apache2/conf/sites, we insert the following in httpd.conf (full httpd.conf file can be downloaded from here):
|
1 2 |
# To Load our VirtualHost Configuration files IncludeOptional conf/sites/*.conf |
Note that we are asking Apache to listen to ports 8000 and 8082. Port 8000 is the port you specified on the local host side while setting up the SSH tunnel earlier. Port 8082 is for local debugging described in the next section. These ports are mapped to the same ports on the docker host using docker port mapping. Google for docker port mapping if you are not familiar with this concept.
Our main application server is listening on port 5000 and the server for debugging purpose is listening on port 5001 on the local machine. The application server exposes an endpoint my-endpoint, which you want to be reachable on the URL www.my-web-address.com/my-path/my-endpoint. This is done using the ProxyPass and ProxyPassReverse directives. Note however that instead of Proxying to http://localhost:5000/my-endpoint, we are instead using http://172.17.0.1:5000/my-endpoint. This is because the Apache server is running inside a docker container and the default docker bridge IP is 172.17.0.1. See this for more details about docker networking.
|
1 2 3 |
@application.route('/my-endpoint/<query>', methods=['POST']) def my-endpoint(query): # my compute intensive application code |
Local Debugging
Containerizing your application makes it possible to deploy it without worrying about dependencies and use container orchestration systems such as Kubernetes. However, for local testing and debugging, there is no better way than running your application in a good IDE, setting breakpoints, inspecting the contents of data structures etc. For local debugging, I run the Flask server directly using Pycharm, my favorite Python IDE on a different port (I use 5001) than the port used by the containerized application. I then set up a separate virtual host that accepts traffic on port 8082 and directs it port 5001. See path marked as (5) and (6) in the system architecture diagram shown above. Now we can access the application by typing the URL localhost:8082/my-path/my-endpoint. If you set a breakpoint in your handler function, it should get hit when you issue the http request. Note that since the http server is still running as a container, we must still use the docker bridge IP (172.17.0.1) in the ProxyPass and ReverseProxy pass directives.
This concludes the post! I hope you found the information useful. Please leave a comment if you do.
Leave a Reply